THE "UAYCEF" KNOT SYSTEM:
THE "KNOTTED FROG"
By Chris Nicola. Edited by Robert Zimmerman
INTRODUCTION:
Why can't a Knots system be made using two, rather than three, Helical knots and a single strand of rope? It can, and I will now describe both the development and construction of such a system: the UAYCEF [pronounced U-AY-CEF] system.
The UAYCEF system is a lightweight compact system making use of just one strand of rope, connected to the main rope by two Helical knots and works just like a Texas or Frog system.
It should be noted that this paper presupposes a familiarity with conventional knots systems and is not intended as a beginners guide to climbing with knots.
BACKGROUND:
About one year ago I found myself in West Virginia's Mott Hole using a Texas system which I had recently modified by connecting the top and bottom ascenders to one another via way of a bungie cord. It was while climbing up to a ledge that I thought to myself "I wonder if it would be possible to do this with Helical knots in place of the mechanical ascenders? The rest of the trip was now devoted to not only exploring Mott, but to also thinking about how I would go about designing a new knot system.
In designing this system, I first bought a 30-foot piece of 6mm accessory cord. I then tied two Chicken Loops at one end, of sufficient lengths as to 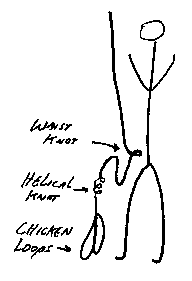
 allow for the wearing of caving boots, but at the same time, with enough slack that both feet could be removed easily in an emergency.
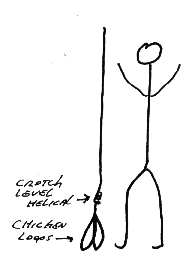
Next, a Helical knot was tied at crotch level to the main rope (Fig.1). A figure 8 knot was then used to attach the loose end of this Helical to the screw link of a diaper seat made out of webbing (Fig. 2).
The length of the cord from the Helical to the waist attachment (i.e. screw link) was found to be extremely crucial to both the overall efficiency and safety of the system. If tied too short , the lower helical prevented the climber from standing completely upright, 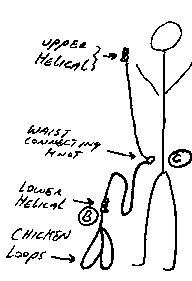 thereby limiting the height gain during each climbing cycle. In other words, the cord running between the lower helical and the waist connecting knot (points B and C in Fig. 3) has to be long enough to allow for slack in the line whenever the climber stands upright. Otherwise the distance in each standing cycle will be limited.
Using the loose end of the cord attached to the waist harness, an upper Helical was then tied to the main rope just below the climber's Adam's apple (Fig. 3).
Having now successfully used the system in caves , under a variety of conditions, over the course of the last few months, the writer is now ready to publish step-by-step instructions.
SYSTEM CONSTRUCTION:
In making the system, remember to allow for the wearing of boots, coveralls, etc. in determining the lengths of all cords and webbing. In addition, allow a minimum of six inches at the end of each knot so that once the system has been used for awhile, you will have the necessary cord to fine tune the system.
The items needed to construct your system are the following:
- 30 feet of 6mm accessory cord
- 1 screw link
- 30 feet of 1 inch webbing
|
Step 1: The Waist Section (Fig.4). |
 I. The Webbing Components:
Step 2: The Diaper Seat (Fig. 5)*.
Take the remaining uncut length of webbing and make a loop.
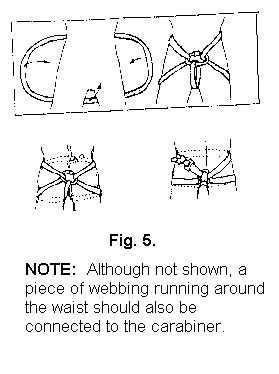 Now, place the loop behind you by holding your hands to your side while making sure the topside of this loop is flush against the small of your back. Next, reach under between your legs and pull the lower segment of the loop forward and up over your crotch area. Using a screw link, connect this part of the webbing to the waist section made earlier. Then pull the webbing in from both sides, wrapping it around you until it also can be connected to the just mentioned screw link. Finally, while in a squatting position, eliminate all slack until the seat sling feels snug and then tie a Water knot (Fig. 5b) to secure the ends of the loop together.
 Step 3: The Optional Chest Harness (Fig. 6)*:
Make a webbing loop, twist it once, creating a large figure "8" design. Place this loop behind you while sliding one arm through each of the two smaller openings of the "8" shaped loop. Finally, use a locking carabiner to connect the opposite ends of the loop across the front of your chest, taking
out all slack in the process, and then tie off the ends by means of a Water knot.
[Note: Once the cord components are constructed in the next section, the just mentioned carabiner will then be slipped over the accessory cord segment leading from the waist to an upper Helical knot (Fig. 6)*].
II The Cord Components:.
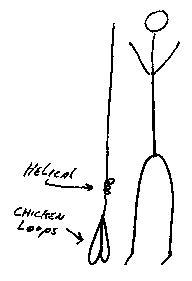
A). The Chicken Loops (Fig 7a).
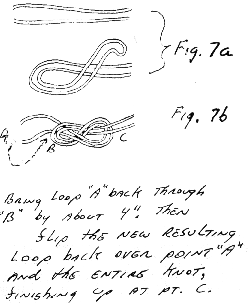
Step 5: Take an end of the uncut 30-foot cord in one hand, and then wrap it four times around your bent arm (i.e. 8 lengths as measured from elbow to hand). Of course, if you prefer a system with only one chicken loop, you would wrap the cord only half as many times around your arm.
Step 6 (Fig. 7b): Tie the resulting loop off by means of a LOOSE figure "8" knot (You will shortly have to thread cord back through this same knot).
|
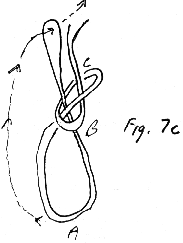
Step 7 (Fig. 7c): Take the bottom end of the resulting loop and trace it once through the figure "8" knot, only bringing through about 2.5 to 3 inches of the end of the loop. |
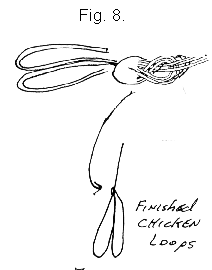 Step 8 (Fig. 8): Pull the bottoms of each of the two resulting large loops through the upper smaller loop, which you just made above. Continue pulling these loops through until the figure "8" knot also passes through this same smaller loop. Finish by dressing the resulting Double Figure Eight knot such that both chicken loops are of equal lengths.
B). The Attachment Helicals:
 Step 9 (Fig. 9): With the chicken loops now attached to your feet, and standing erect, pull the cord upward to remove all slack. Then, mentally mark off that point on the cord which comes up just level to your crotch. Next, attach the cord to the main rope at this location by way of a Helical knot. Keep in mind that the more times you wrap the accessory cord around the standing rope, the greater the resulting friction when you climb-- better to have too many wraps, then too few. (Note: the author, being 162 lb., finds it necessary to use 4 to 5 wraps in making a Helical on standard 11mm rope).
Step 10 (Fig 10): With all the slack taken out between the foot loops and first Helical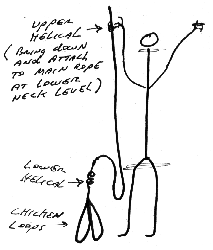 (i.e. the lower one), and standing erect, take the loose end of the cord and trace out a length going down to one knee and then looping back up to a point above your head. Continuing to hold the cord above your outstretched arm at this point, so as not to lose the length just measured off, bring the cord down to a point on the main rope level with the base of your neck. A second Helical is now attached to the main rope at this point (Fig. 10).
[Note: at some time in the future you will more than likely have to shorten this particular length as you fine tune the system].
C). The Waist Connection Knot:
Step 11 (Fig. 11): Standing upright, with the second Helical now attached to the main rope at a point level with the hollow at the base of the neck, and the lower Helical pulled up to its highest point,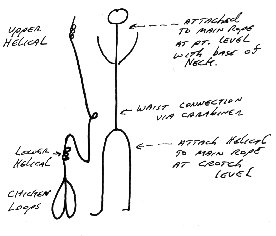 level with your crotch, hold the top Helical firmly in place with one hand as you use the other hand to pull downwards so as to remove all slack leading to down to the waist. Next, use a figure "8" to connect this cord, which should now be free of any slack above, to the screw link of the diaper seat.
As a final step, in the event you chose to use a chest harness (e.g. being top heavy), slide the line going from your waist to the upper helical into the previously mentioned chest carabiner.
Your system is now finished and you are ready to climb. I recommend, however, that you add a prusik and extra carabiner for emergencies, passing
lips, knots, or other cavers on the rope.
USING THE SYSTEM:
You climb much like any frog system. You climb by standing up, putting your weight on the lower knot and simultaneously raising the top knot. Then you sit, putting your weight on the top knot so that you can raise the lower knot. The cycle is then repeated. When raising either knot always lift them from below the knot.
Since this article presupposes a familiarity by the reader of conventional knots systems, the writer will decline from a further discussion on the basics of knots systems. Should the reader require such information, I recommend the NSS publication On Rope, selected back issues of Nylon Highway, and Bob Zimmerman's article in the August 1992 edition of Met Grotto News
[Note: Bob was the one who taught me Knots, what now seems like so many years ago -- Thanks, Bob].
SPECIAL CIRCUMSTANCES:
With the basics out of the way, we can now discuss system modifications. The system as designed is good for straight climbs on a rope free from waterfalls, intruding walls, or other obstacles. Faced with these problems, however, you can do the following;
1). Fending off a wall can be handled by placing only one foot in a chicken loop, leaving the other foot free.
2). Short climbs of 10 to 20 feet may just call for use of only one open foot loop instead of two full chicken loops.
3). Climbers who are naturally top-heavy, or who have a heavy back pack, might find it necessary to use a chest harness in combination with a carabiner. This will keep them vertical.
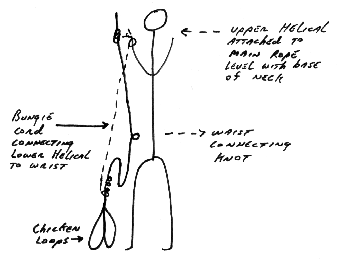
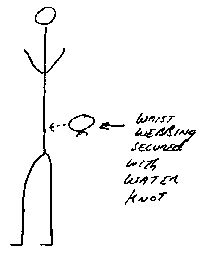
A final special circumstance is that of competitive racing. Although not fully tested yet, the writer has discovered that climbing speed can be increased by use of a bungie cord connecting the underside of the lower Helical to one of the climber's wrists (Fig. 12). While a small screw link can be used to connect the bungie cord below the lower Helical, a Velcro strap of some sort can be used to connect the bungie cord to the climber's wrist. The velcro is necessary because it allows for quick removal of the wrist strap in an emergency.
CONCLUSION:
There you have it; a single rope knot system, which can be easily put together from the type of 30-foot handline some routinely carry in their caving pack. It is not only more compact than the conventional three knot system, but safer because of the safety line running from the lower helical knot to the waist. Because a conventional system lacks this extra feature, a failure of the upper knot will cause a heel hang.
Good luck with your new UAYCEF Knot System.
Oh, I almost forgot to answer the question of "What is the derivation of the word "UAYCEF"? While it was Bob Zimmerman who introduced me to Knots, it was Ukrainian caver Valeriy Rogozhnikov, co-founder, along with Ed Sira and myself, of the Ukrainian American Youth Caver Exchange Foundation (UAYCEF) who, over the course of many hair raising hours in the deep pits of the Crimea, taught me the finer points of the principles and techniques of vertical work. Thus, I could think of no more befitting tribute than to name a new vertical system after an organization dedicated to the new cavers of the world, kids who participate each year in UAYCEF's student exchange trips to both the U.S. and Ukraine.
[Note: Donations for the UAYCEF (NSS # IN 45732) graciously accepted; made payable to "UAYCEF", C/O Ed Sira at 37 Woodmere Street, Raritan, NJ, 08869].
* These diagrams were copied from an article of Robert Zimmerman's which appeared in Met Grotto News, "The Lightweight Simple Knots System" August 1992 (Vol. 42, No. 8).
Return to the Top of the Page
Return to the NH #44 Contents Page
Copyright © 2000 Vertical Section of the NSS, Inc. - All Rights Reserved.