A simple and safe change-over procedure
by Matthew Hazelton, WUSS #0449; NSS #47187, and
Horton Hobbs III, WUSS #001; NSS #12386 HM, CM, FE
Rappelling, ascending, and caving are inherently dangerous sports and should be experienced only after receiving proper training. Most importantly, all procedures described in this article should be practiced in a safe and controlled environment with direct instruction from a knowledgeable teacher. Accidents may happen even if these instructions are followed exactly. In no way can the authors, Wittenberg University Speleological Society, Wittenberg University, or the National Speleological Society be held accountable for any accident(s) due to gear malfunction, improper instruction, or unforeseen acts of God.
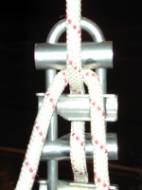
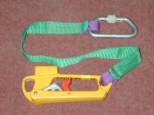
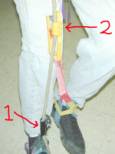
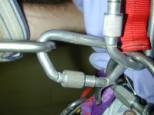
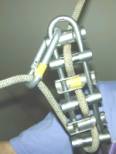
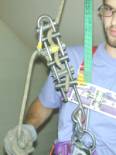
Vertical rope work is enjoyable and, if practiced properly, usually very safe. Occasionally problems arise while you are on-rope (e.g., the rope rigged too-short, clothing or hair become caught in rack, or you need to pass over a knot when two ropes are tied together). When a problem occurs, it is paramount that you have the training and experience needed to correct the problem and/or safely get off-rope. One fundamental skill for getting off-rope is "changing-over." This procedure involves switching from rappelling to ascending or ascending to rappelling while on-rope. The instructions that follow are intended to provide a refined technique for Single Rope Technique (SRT) users to change-over. This method specifically eliminates the problem of pinned rope (Figure 1), as described by Jancin (1994), while tying-off. Bain (1991) and Jancin (1994) addressed the use of the Carabiner Rack Configuration (CRC) (Figure 2), but until now the CRC has not been incorporated as a fundamental step of changing-over.
*Note: There are many ascending systems used by cavers (e.g., Three-knot prusik, Mitchell, single or double bungee ropewalker, Frog). The system used here is a hybrid, much like the one pictured in Smith and Padgett (1996: Fig 6-34).
 |
 |
|
| Figure 1 | Figure 2 |
Gear needed for ascending, rappelling, and changing-over
- Rope 7/16" (rigging equipment and know-how)
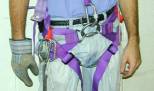
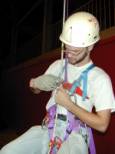
- Seat harness (Figure 3)
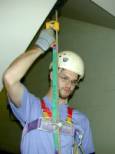
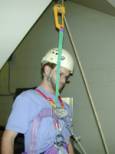
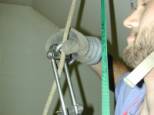
- Helmet (Figure 4)
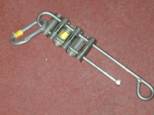
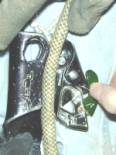
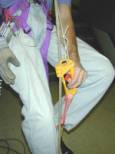
- Rack (with stainless steel bars and a non-locking carabiner attached above the top bar of the rack (hanging on the open side of the rack) (Figure 5)
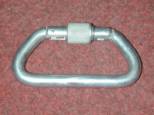
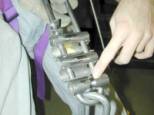
- Screw link (a.k.a. maillon) or locking carabiner (Figure 6) used with seat harness
- Chest harness w/ roller and non-locking carabiner attached (Figure 7)
- QAS (Quick Attachment Safety - e.g., Jumar with attachment to harness) (Figure 8)
- Foot ascender (with foot attachment) (Figure 9-1)
- Knee ascender (with foot attachment) also attached by cord to harness (Figure 9-2)
- Gloves (preferably leather palmed)
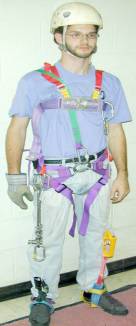
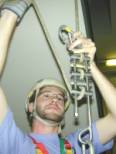
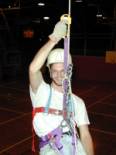
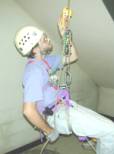
Full gear correctly positioned on a person (Figure 10)
 |
 |
| Figure 3 | Figure 4 |
 |
 |
 |
| Figure 5 | Figure 6 | Figure 7 |
 |
 |
 |
| Figure 8 | Figure 9 | Figure 10 |
Rappelling:
Before you begin rappelling, you must make sure that the rope is properly and safely rigged and that there is a figure eight on a bight at the trailing end of the rope. For safety purposes, a full set of rappelling as well as ascending gear need to be worn for the rappel (this should be a procedure used by all cavers but is absolutely mandatory for the first person rappelling into a pit). Attach the QAS to the rope before you approach the edge. Announce to everyone around, especially your belayer (if you have one), that you are "On Rope." Attach your rappelling rack to the rope and make sure that you have the rack oriented and threaded correctly. Have a knowledgeable person double-check your gear to make sure that it is properly attached and ready for use. If you have a belayer, ask the question "On Belay?" Wait for the reply "Belay On" from your belayer. Hold the trailing end of the rope in your dominant hand and do not let go with this hand until your rappel is completed. Announce that you are "Rappelling" and wait for the response "Rappel On" from your belayer. Remove your QAS from the rope using your non-dominant hand, secure it to your seat harness, and begin your rappel. Once you are finished with your rappel, have removed the rack from the rope, and moved away from the rope call out that you are "Off Rope and All Clear."
Rappelling summary:
- Make sure that you have on a full set of rappelling and ascending gear (Figure 10)
- Make sure the rope has a figure eight at the trailing end
- Have QAS attached to the rope before approaching the edge
- Announce that you are "On Rope"
- Attach your rappelling rack making sure you are threading it correctly (Figures 2, 15, 17)
- Have a knowledgeable person check to see that all your gear is attached properly and ready to be used
- Ask "On Belay"
- Wait for reply "Belay On" (if someone is able to belay your rappel)
- Hold the trailing rope in your dominant hand (do not let go with this hand until the rappel is completed)
- Announce that you are "Rappelling"
- Wait for reply "Rappel On" from your belayer (if you are being belayed)
- Remove your QAS with your non-dominant hand
- Begin your rappel
Changing-over from rappelling to ascending:
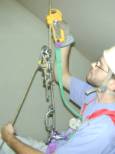
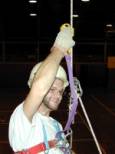
Another unfortunate circumstance (e.g., rope does not reach the bottom of the pit) has forced you to change-over, this time from rappelling to ascending. Begin by bringing the rope under the last bar and pulling up to tighten the bars together. Then, take the loop of rope, which you just pulled up, and clip it to the carabiner attached above the top bar on the rack. Attach the QAS to the rope, above the rack, and push it as high as possible. Once the QAS is high on the rope, attach both your foot and knee ascenders to the rope. Make sure that your foot and knee ascenders are high enough on the rope so that when you stand, the QAS attachment to your harness becomes flaccid; yet the foot and knee ascenders should not be so high that it is excessively difficult to stand. Stand up on your foot and knee ascenders and push the QAS up the rope as far as possible. The attachment between the QAS and your harness should be taut. Now, sit down in your seat harness and detach the rappelling rack from the rope. Attach the roller of your chest harness to the rope and begin your ascent.
Change-over summary (rappel to ascend):
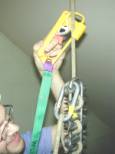
- Bring the rope under the last bar and pull up to tighten the bars together (Figure 18)
- Clip the loop of rope, which you just pulled up, through the carabiner attached above the top bar on the rack (Figures 18,19)
- Attach the QAS to the rope, above the rack, and push it as high as possible (Figure 26)
- Attach your knee ascender (Figure 24)
- Attach your foot ascender (Figure 14)
- Your foot and knee ascenders should be high enough on the rope that when you stand the QAS attachment becomes flaccid, but not so high that it is excessively difficult to stand
- Stand up on your foot and knee ascenders
- Push the QAS as high on the rope as possible (Figure 21)
- Sit down in your seat harness
- Detach the rappelling rack from the rope (Figure 17)
- Attach the roller of your chest harness to the rope (Figure 12)
- Begin to ascend
Ascending:
Before you begin ascending, as you approach the rope, announce that you are "On Rope." Attach your gear to the rope in a bottom-up sequence, beginning with your foot ascender. Next, attach your knee ascender, followed by attaching the chest roller to the rope. The Quick Attachment Safety (QAS) is the last piece of gear to be attached and the cord, or webbing, should run behind the chest harness or through a second chest harness roller if the harness has two. A knowledgeable person should check over the attachment of the gear before you begin to climb. pecifically, make sure the seat harness has its straps doubled back, all carabiners and screw-links are locked, the chest harness is tightened and the roller(s) properly closed, that each ascender's cam is closed correctly, and that the rope is properly and safely rigged.
Announce that you are beginning to ascend by calling out "Climbing." After getting the reply "Climb On" you may begin ascending. When you are climbing, take short steps and do not try to climb using your arms and QAS to pull you up the rope; it is much more efficient to climb by walking up the rope.
Ascending Summary:
- Announce that you are "On Rope"
- Attach gear to the rope from the bottom up
- Foot ascender (Figure 9-1)
- Knee ascender (Figure 9-2)
- Chest harness roller (Figure 12)
- QAS with its cord or webbing running behind the chest harness (or through
chest harness roller if harness has two) (Figure 11)
- Have a knowledgeable person check over attachment of gear (carabiners locked, harness doubled back, gear correctly positioned and tightened, and the rope rigged correctly).
- Announce that you are "Climbing"
- Take short steps and do not try to climb using your arms and QAS to pull you up the rope. It is most efficient to walk up the rope.
Changing-over from ascending to rappelling:
Once you have reached a place or circumstance where you need to go back down the rope, you will need to change-over to rappel. Begin by pushing your QAS as high on the rope as possible. Next, detach the chest roller from the rope and sit down in your seat harness. Be sure to replace the pin of the chest roller. Detach your foot ascender from the rope making sure to keep your knee ascender and QAS attached to the rope. Attach the rack to your seat harness screw link (a.k.a. maillon) or locking carabiner with a locking carabiner and position it so that the groove on the top bar is facing up at you (NOTE: NEVER unlock your seat harness screw link (maillon) or locking carabiner. Always use an additional locking carabiner to attach the rack to the seat harness). Thread the rope through the rack while keeping the rack as high on the rope as possible. The higher on the rope you attach the rack the more easily and safely the rest of the change-over will proceed. Once you have threaded the rack completely, bring the rope under the last bar and lift it up to position the bars closer together. Clip the rope, which you just pulled up, through the carabiner on the top of the rack and pull it down by your hip. You now have the rack tied off completely. This method of tying off the rack is far superior to the traditional method of bring the rope under the last bar and looping it over the top of the rack. The traditional tie off often results in getting the rope stuck "pinned" between the two top bars of the rack and the rope (Figure 1), thus making restarting your rappel difficult, to impossible, and unsafe. Stand up on the leg that is still attached to the rope, and slide the QAS down close to the top of the rack (but not touching the rack, otherwise it may get jammed). Sit down in the harness again and then detach the knee ascender. From this point on, you must hold the trailing rope in your dominant hand as if you are rappelling. Detach the QAS, keeping in mind that you must never remove your dominant hand from the rope. Now, hold the trailing rope vertically above the rack and unclip the carabiner at the top of the rack with your non-dominant hand. You are now ready to proceed with your rappel.
Change-over summary (ascend to rappel):
- Push QAS as high as it will go on the rope (Figure 11)
- Detach chest roller from rope (Figure 12)
- Sit down in seat harness (Figure 13)
- Detach foot ascender (Figure 14)
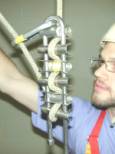
- Make sure the rack is correctly aligned (Figure 15) and attach it to your seat harness carabiner or screw link with a locking carabiner (Figure 16)
- Thread the rack and make sure to keep the rack as high on the rope as possible (Figure 17)
- Bring the rope under the last bar and pull up to tighten the bars together (Figure 18)
- Clip the loop of rope, which you just pulled up, through the carabiner attached above the top bar on the rack (Figures 19, 20)
- Stand up on your leg that is still attached to the rope (Figure 21)
- Slide the QAS down close to the top of the rack (but not touching the rack, it can get jammed in the rack) (Figure 22)
- Sit down in the harness again (Figure 23)
- Detach the knee ascender (Figure 24)
- Hold the trailing rope in your dominant hand as if you were rappelling (Figure25)
- Detach the QAS with your non-dominant hand keeping in mind that you must never remove your dominant hand from the trailing rope for the remainder of the change-over or rappel (Figure 26)
- Hold the trailing rope vertically above the rack (Figures 27)
- Remove the rope from the carabiner at the top of the rack by unclipping the carabiner with your non-dominant hand (Figure 28)
- Proceed with your rappel
 |
 |
 |
 |
| Figure 11 | Figure 12 | Figure 13 | Figure 14 |
 |
 |
 |
| Figure 15 | Figure 16 | Figure 17 |
 |
 |
 |
 |
| Figure 18 | Figure 19 | Figure 20 | Figure 21 |
 |
 |
 |
 |
| Figure 22 | Figure 23 | Figure 24 | Figure 25 |
 |
 |
 |
|
| Figure 26 | Figure 27 | Figure 28 |
Literature Cited
Bain, David L. 1991. Carabiner Rack Configuration. Nylon Highway, 33 (January): 17.
Jancin, Mark. 1994. Change-Over With a Rack. Nylon Highway, 37 (February): 2-9.
Smith, Bruce and Allen Padgett. 1996. On Rope: North American Vertical Rope
Techniques, New Revised Edition. National Speleological Society, Huntsville, 382 pp.
Return to the Top of the Page
Return to the NH #48 Contents Page
Copyright © 2003 Vertical Section of the NSS, Inc. - All Rights Reserved.